Using Identity
A mailer, member database, and so much more, for digital activism. Originally by 38Degrees, maintained by OPEN and everyone using this tool to make the world a better place.
A web app to help you manage your digital activism. Use Identity to consolidate and organize information about your campaigns, to organise your list into segments and list and drive communication through all your different channels, like blast email, SMS, facebook ads, phone-banking, and other media.

Identity is maintained by OPEN, a global sisterhood of grassroots progressive movement organisations. Our tech program is dedicated to building tools that enable millions of citizens to voice their concerns about – like climate change, trade, and corporate accountability. It is built using mostly free and open source software and maintained by the hands-on contributions of the developers who work for the dozen or so organisations who use the tool, who keep the lights on, fix bugs, submit pull requests, and make all our work possible.
Feature List
- Centralized database holding all your member data and their past actions in one place
- Built-in broadcast tools for mass email, SMS, and web push notifications (beta)
- Push targeting lists to other services like Facebook ads and look-alike sets, or Kooragang for phone calls
- Integrates to receive data from: CSL, Speakout, Act.Leadnow, DoPaisa, Skram.la
- Manage and track consents for email subscriptions, SMS, and any other media you like, for a GDPR-compliant CRM that enables truly multi-channel communications streams
- Mailing content tests, embeddable components, and customizable search interface allow you to run a best-practices digital operation on a rapid-response timeline.
Why use it?
Groups use Identity either because they’ve outgrown their old CRM or blast email tool, or because they have developer capacity and they would rather run their own tech than pay for a Software As A Service (SAAS) solution.
In most cases we think Identity provides better functionality than the available SAAS options, especially for groups looking to do truly multi-channel organising, where information might come in from a bunch of different systems (like a separate petitions and donations tool) and go out through different media (like email and SMS) with a need for coordination for targeting across all these systems.
User Guide
Login
Ask your admin
Your first interaction with Identity will be that you’ll receive an email letting you know that your developer has just added you as an admin on Identity.
Ask your administrator for an account on your Identity server. If you’ve got an account through the OPEN’s demo instance, go here to access: https://identity-open.herokuapp.com/login. You can email the OPEN staffer you know, or identity@the-open.net.
Tip! We recommend using the Authy app for 2FA

Dashboard
Once you are logged in, you’ll see the dashboard page along with the main features available on the site like building a mailing list, send an email and a lot more.
Searches and Lists
The Search feature brings you powerful customised look-up options for pulling member data from the Identity database. Using search, you can apply different kinds of filters and consolidate them to precisely get the information you need. Your search results can be used to create a List, which is a one-time snapshot of the results of a search.
Create a new search
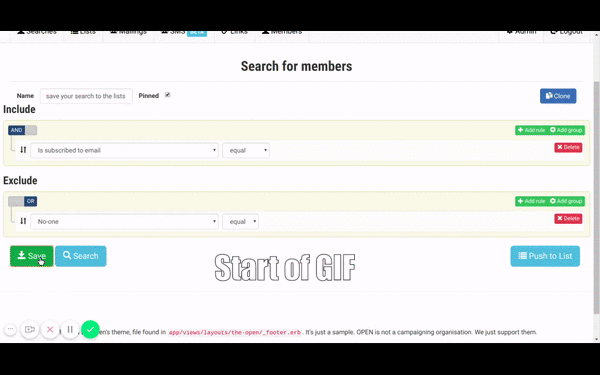
Click on the button titled “New tab”. This will take you to the page below, where you can create a new customised search with a variety of filters -

Refine Your Search
In the page, there are two types of filters provided, under sections Include and Exclude respectively. These two types of filters tells the search API what information to include or exclude from the results.
For example, applying search filters/rules in the Include section will fetch information pertaining to those filters. For example, you can apply a rule that says “Member information whose first name is Martin.
On the other hand, creating a rule in the Exclude section will ensure that information pertaining to that filter gets omitted from the search results. For example, if you apply a search filter in the Exclude section like, “Member information who has a phone number”, then consequently the search results will omit information related to all members who have a phone number.
The search tool has a plethora of different filters that you can use for a powerful search experience. These search options are configurable, so if you find yourself wanting a new option, ask the admins who maintain your Identity instance.
Tip! Using the logical “AND” and “OR”
When you use more than one rule/filter, you’ll need to choose one of the available search parameters - AND / OR.
The AND parameter applies the filters together in conjunction with each other. The OR parameter has the effect of running two or more unrelated searches separately, then returning the combined results.

Push your search results to list for use in mailings, etc.
Once you save your search, you can also optionally add it to a List like below.
To know more about Lists and what you can do with them, refer Lists in this document.
You can add more rules to this search if you need. For example, if you wanted to pull out information about a member whose name is Purnima. You’ll need to apply one more rule to the already existing one in the Include section.
-Apply a second filter by clicking on the “Add Rule” button. Select the “Name” filter from the drop-down menu, then type in the name “Purnima” in the filter’s input field. -Lastly apply the “AND” search parameter. This ensures that the search only returns if it finds members by the name Purnima, WHO IS/ARE ALSO a donor.
If you switch the search parameter from “AND” to “OR”, then consequently the search tool will pull information of members whose first name is Purnima AND ALSO members who are donors.
Lists
A List is a snapshot of a set of Members, either selected by a Search or Uploaded as a CSV. You use these Lists to define the audience for a blast email or SMS, to push to other connected services, or save and use as includes or excludes for other searches.
Create a new List
To create a list for sending bulk emails, navigate to the Lists page, and click the Paste Emails button. Next, you can give your list a name, and add member emails and click on Make List to save it. This new list will be visible on the Lists page.
Similarly, you can also create a list for sending bulk SMSes by clicking the Paste Phones button, and adding phone numbers of members.
To Subscribe a list to email or SMS updates
At any time you can go back to the Lists page to view all your created lists. Clicking on a list will open up a page for it, where you can view all members belonging to that list/group. To download the member information as a CSV file, click on the Email me a CSV button.
You’ll also find options for deleting the list, and subscribing/unsubscribing the group for emails and Text/SMS updates on the right-hand side.
This is basically a mailing lists which one will create if one wants to send out mails to specific groups/members. Once a list is created, you can send emails to members of that list while composing the email. from the drop down section at the time of writing . You’ll find all the available lists on this page along with the total numbers of members in each list.
Create a list using the Search feature
For adding large number of emails or phone numbers, or for selectively adding members that match a certain criterion, you can use the Search feature to make your process much easier. The Search feature allows you to selectively pull information from the Identity database and push the results to a list. Refer the section titled Searches for more information on how to use them.
This list will be automatically available under the “Send to list” drop down menu on the mailings page either at the time of editing it or creating a new one.
Tip! Re-use searches, but create new lists often
Remember that if you run a search at two different times, you might get two different sets of people, but if you load up a list at different times, you’ll always get the same results. Imagine you frequently find yourself sending emails to, e.g. “Petition creators who are not donors”, to say ~”Our member-run petitions are going great / we hope you felt really supported by our team / please donate so we can support more campaign-starters.”
In that case you’d want to create a Search with those conditions (include: petition starters, exclude: donors), and then each time you have an email to send to those types of people, refresh that Search to create a new List for the email you’re sending out that week.
Mailings
This is one of the most frequently used feature in identity and is used to send bulk emails.
The Mailings tab displays mailing lists along with the status of the emails, number of recipients and number of clicks.
Create a new mailing
To compose a new email, click on the button called “Create a new mailing”. (See the screenshot below.)

This will take you to the below page where you’ll see variety of fields to cater to your different needs.

Name: This field value will be visible only to you, and not to your recipients. Pick a name such that you remember the contents of this email template.
Subject: The subject of your email, visible to all recipients.
- To enter just one Subject Line, type in the subject here directly.
- To run a test to see which Subject line will lead to the email being clicked by the user, click on the Tests tab in the edit section alongside.
When you do this, emails will be sent with the different Subject Lines that you have provided. You can always check the Mailings tab again to see which Subject Line has resulted into the email getting clicked or opened, based on the statistics shown.
To know more about how to create a test, click here.
Template: Templates help you to define the style and presentation of your email. You can choose from amongst this list of templates, or create your own template from the Mailings Template tab, under the Mailings page (however, this requires one to have a basic knowledge of HTML and CSS).
From Name: This is the display name of your email. Choose a name that sounds familiar to the recipient of your email. In most cases, this would be the name of your brand or product.
From Email: This field is used to display the sender’s email to the recipient.
Send to list: This is where you can choose the mailing list that you want to send this email to. You can choose from amongst the lists in this dropdown, or create a new mailing list.
Compose an email
This field contains the body of your email. While it contains a formatting bar to make your email look presentable, you can also make use of templates (mentioned above) to do so.
Identity offers various options to give your content a personalised touch, as well as to find out which content appeals to which sections of your audience. These are found as tabs in the section alongside viz. Merge, Datasets, Tests and Components.
Add A/B/X tests or and subject line tests
Often, we need to analyse which Subjects or what kind of content will appeal to our audience. To do this, one can make use of tests. These tests are available under the Tests tab, in the section alongside.
For example, suppose we want to send an email with two different subjects, to see which subject appeals to the recipient, such that it makes them click on the email (to open it). For this, we will create a new test.
To create a new test,
- Click on Add Test, under the Tests tab.
- In the text field that appears, we will enter a random name e.g. subject_test, which will be used as a new Merge tag. This name should be different from the tags available under the Merge tab.
- After entering a name, click on “Add New Test Case”.
- Now in the text box that appears, add one alternative for the Subject e.g. “Beat Plastic Pollution”.
- Click on “Add New Test Case” again and add another alternative for the Subject e.g. “Our Oceans are in Danger”.
- Now, under the Subject field of our email, we will use this tag i.e. subject_test

This will send out two separate emails with different subjects. To know which subject appealed to the majority of the audience, you can always check the Mailings tab, based on the statistics shown.
Click
Similarly, you can also run tests to send out emails with different contents in the body.
Merge in Member information
Campaigners often prefer to send personalised mails to recipients. To do this, you can make use of merge tags, found under the Merge tab in the section alongside.
For example, let’s see how to use the {first_name} tag provided in the Merge tab.
Hi {first_name},
Have a nice day!
Above code will produce the below result.
Hi Dave,
Have a nice day!
There’s a list of other merge tags you can use in the sidebar on the right, including the information on their elected representatives who may be the topic of your email or the target of your action.
Mailings (for Administrators)
Use Datasets to merge additional custom info on members, postcodes, or constituencies
Docs coming soon.
Use pre-made “Components” to insert blocks of styled content
If you want to insert that specific type of colored, centered button that your organisation uses, or you want to put in a featured-image box or a callout box or a centered image with a caption – you can do it!
Your administrator will use the Mailing Components feature to set up these components as little templates, so you can just enter the text or links you need and let the Component do the rest.
You can group a bunch of information as a single component and assign it a name / alias. Then, simply type the component name while writing an email and it will have load the information in the draft.
Set up a recurring mailings (beta)
This feature isn’t here yet. But when it is! You’ll compose the email as normal and then click “Send” and on the following screen you’ll have the option to send now or schedule the mailing.
Create your own Mailing Template (advanced)
Creating a custom template requires one to have familiarity with HTML and CSS. Only administrators should really work with mailing templates. Else, contact your administrator to create one for you that suits your needs.
- Click on the button “New Template” and give it a meaningful name.
- Try finding a responsive email template you like online and copy that into the top and bottom section. Your email content will go in between.
SMS Blast
This section will allow you to send SMSes to a list of members.
- To Send an SMS to a list of members:
- Click on “Create a new text blast”. You can find all your lists under the dropdown menu. Choose the one that contains phone numbers.
- Type out your text message. You can optionally give a name to your text blast.
- Finally, click on Send to send your SMS to the whole group.